Five foundations
⇦ Tillbaka
1. Understand where you are on the map and where you are going
The first step when practising orienteering is to understand where you are on the map and where you are going.
The orienteering course is made up of the start (purple triangle), a number of controls (purple numbered circles) and the finish (purple double circle). Find out where you are on the map and which control you are supposed to visit next. The controls have to be visited in numerical order.
Turn the map so that the control you are heading towards is pointing upwards.
Look at the map to find what object (boulder, path crossing, building etc.) the next control is located at, so you know what you are heading towards. Use the control description if there is one.
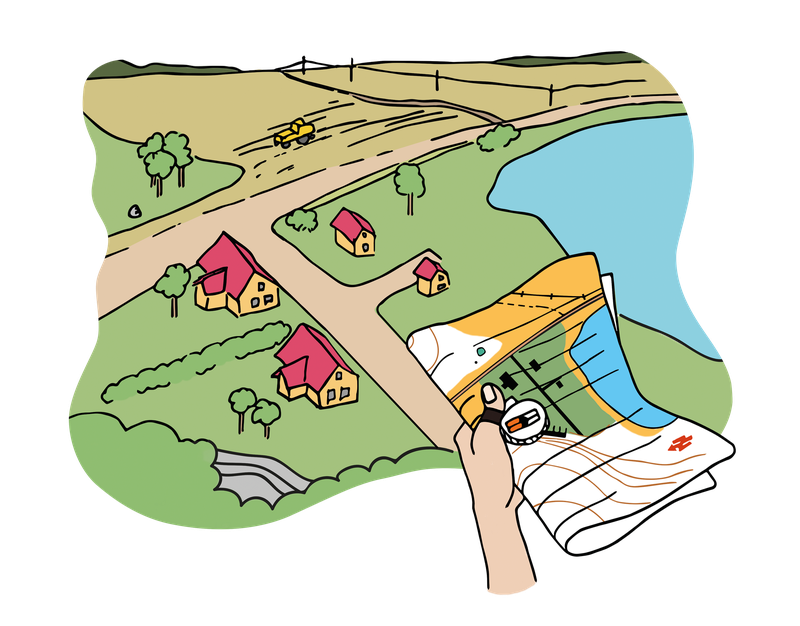
Piece of advice! It is often an advantage to fold the map to get it a bit smaller and easier to handle. This also makes it easier to keep track on where you are on the map and where you are heading. Fold the map at each control to make sure that everything you need to keep an eye on is visible, like the next control and the possible route choices to get there.
2. Orientate your map
Orientate the map to make it easier to read and compare against the terrain. This means that you turn the map until it corresponds to the terrain and features around you. To explain it even more this implies that you are supposed to hold the map such as the objects to your left in reality also is to the left on the map, the objects to your right is seen to the right side of the map and so on. If the map presents that the next control lies beside the path to the right in the next path crossing, it is therefore easy for you to understand that you are going to choose the right path.
The compass is a perfect tool to orientate the map in a faster way. The north side of the map, which always is the upper part of the map sheet, are supposed to be directed in the same direction as the north side of the compass needle (the red part). Everything written on the map is printed with the upper part as the north side. Therefore, if you hold the map in front of you and is able to read the written letters in the right way, you have the north side of the map upwards.
Imagine the map as a piece of a puzzle, that it exactly like a piece of a puzzle only fits in one way where it corresponds to its surroundings – the nature and terrain. You can also think of it as a simplified aerial photo where houses, roads, paths, hillss and smaller details like boulders and cliffs are pictured as different symbols.
Piece of advice! If you feel insecure about the map reading, you can start getting to know how the map and the real world are connected by just standing still and comparing the map with what you can see around you. If you see buildings, roads and paths – can you identify them on the map? To be able to understand how you translate the map and reality against each other is an important foundation which provides a feeling of security when it comes to orienteering.
3. Choose and plan your route
Once you have the map oriented, you know where you are and where you are going, it is time to plan for how the get there.
There are no right or wrong ways regarding route choices, but what is important is to choose the route which suits your abilities in the best way. The course planners’ task is to think of several possible route choices, so there are usually shorter route choices with more difficult orienteering as well as longer route choices with easier orienteering.
On courses with a lower level of difficulty, you can often choose to follow clear terrain objects, so-called handrails, such as roads and paths. Use these to simplify the orienteering. When no handrails are available on the way to the control, you need to use a compass bearing and navigate via clear objects in the terrain.
If the distance to the next control is long, divide the route into smaller stretches and look for some clear features that you should pass along the way.
4. Going from A to B
Once you have decided on a route, it is time to take action.
Decide the direction to the next control. Lift your gaze and aim to find a clear object further ahead and make your way there. Check off different terrain objects along the way to verify that you are on the right track.
A sense of distance judgement comes with experience. An important basic understanding, however, is to be able to interpret the map scale. If you have a map scale of 1:10 000, which is the most common scale in orienteering, it means that one centimetre on the map corresponds to 100 meters in reality.
Remember to keep the map oriented to north at all times. This means that you need to adjust your grip on the map along the way when you turn yourself and changes direction.
The so-called thumbing or thumb grip is a helpful method for keeping track of where you are on the map. This means that you place your thumb where you are and keep it there until you read the map the next time. You will then quickly find where on the map you were the last time you had a look. Fold the map appropriately so that you reach with your thumb.
5. Find the control
The last step is to find the control in a safe way.
As you begin to approach the control, look at the map if there is any clear object near the control that you might find useful to look for, and lift your gaze to check it off.
Once you have found and punched the control – be proud of yourself!
Now you just need to repeat these five steps for each control – understand where you are and where you are going, orientate the map, choose and plan your route, implement the plan and go from A to B while checking that you are on the right way – until all controls have been punched and you reach the finish.
The best of luck!
Piece of advice! If it does not go as planned, think about what objects you have passed by and try to understand where you may be. If you do not find it, go back to the last known place you were at and try again. In orienteering, it is common to have to go back and redo some of the steps, even for the very best ones. Practice makes perfect.